Drain Assembly Installation
KITCHEN SINK DRAIN ASSEMBLY – QUICK GUIDE
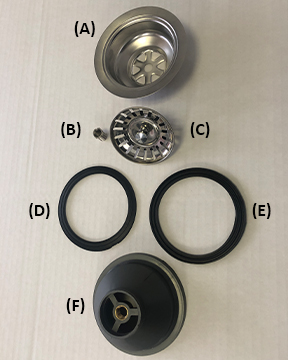
Drain assemblies consist of the following components:
- Metal Strainer Body (A)
- Locking Nut (B)
- Strainer Cup & Plug (C)
- Thin Rubber Gasket (D)
- Thick Rubber Gasket (E)
- Grey Plastic Drain (F)
1. UNPACK & ORGANIZE
- Take apart the drain assembly as packaged and lay out the parts in the order you remove them.
2. SEAL THE STRAINER
- Apply a bead of 100% neutral-cure silicone to the underside rim of the metal strainer body (A).
- Fit the thin rubber gasket (D) onto the strainer body with the groove facing the sink.
3. INSTALL IN SINK
- Insert the strainer body into the sink drain hole.
- Press down firmly to seal, then wipe away any extra silicone with a damp cloth.
4. POSITION CUP & LOCK NUT
- Place the strainer cup & plug (C) with the locking nut (B) attached into the strainer body and hold it in place.
5. ATTACH FROM BELOW
- Under the sink, fit the thick rubber gasket (E) (groove facing up) into the grey plastic drain (F).
- Press it against the underside of the sink so the locking nut (B) aligns with the threaded hole.
6. TIGHTEN
- Hand-tighten the locking nut into the grey plastic drain.
- Remove the strainer cup & plug (C), then finish tightening the nut with a flat screwdriver in the groove.
7. FINISH PLUMBING
- Continue with the rest of your plumbing installation.